There are a million reasons to love Quadrostyle stickers—among them, the fact that they can stand up to pretty much anything. From shuffling feet to the tip-tapping of clawed pets, our floor and tile stickers are designed to hold up against all normal wear and tear. The daily hustle and bustle of your home is no match for our impressively resistant vinyl stickers, even when used on high-traffic areas like the kitchen or bathroom floor.
Still, it’s normal for customers with busy households to worry about edges peeling up. Though we stand by the durability of our product, there is one solution we can suggest to those who want that extra bit of confidence that their Quadrostyle stickers won’t budge: seal the edges of your tile stickers using a polyurethane finish.
It’s a simple enough solution but will require at least a couple of days of dedication while you prep tiles and wait for each coat of polyurethane to dry. But, with a bit of work and patience, your floor will be gleaming and ready for your worst.

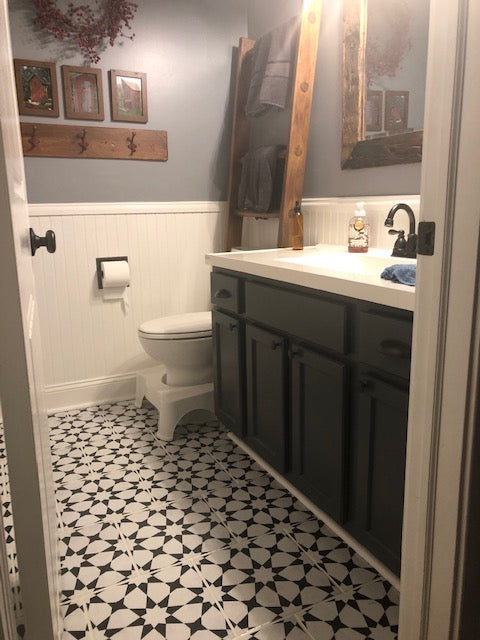
Image Source: @mcmom555
However, before you crack open the polyurethane, you should know that once sealed to the floor, your Quadrostyle stickers will no longer be removable. Easy, tack-free removal is one of our trademarks, making our stickers ideal for renters as well as those who like to switch up their interior style frequently. But unless you can make a long-term commitment to your tile stickers, you should not use this method to seal them.
Why Seal In Your Stickers?
Sure, sealing in your stickers makes them no longer removable, but there are plenty of reasons to do it. For example:
- Lasts longer – As fun as it is to redesign your home every few years, it takes a lot of work and not everyone has the time or the resources for that. Sealing in your stickers makes them last much longer so you don’t have to worry about replacing them for years.
- Increased resistance – Though our vinyl stickers are pretty tough on their own, a polyurethane finish will make them virtually indestructible. No need to worry when rearranging furniture or sliding around chairs.
Finally, this method is great for floors, but unnecessary for vertical surfaces like walls, stair risers, or splashbacks, as they’re not subject to the same amount of traffic. Of course, if you want to seal in your wallpaper, that’s entirely up to you—just know that it’ll require a bit of work and might not be necessary.
That said, let’s get down to business!
Step 1: Prep the Tiles
If your floor is in relatively good condition, you may not need to thoroughly prepare your current tiles. A simple wash to remove any dust and grime will do.
However, those who are covering up a tile surface with aged and worn-out grout should start by making sure that the grout is in the best possible condition. This step makes all the difference in achieving that “brand-new” look for the finished product.
Option 1: Grout Refresh
One way you can spruce up your grout is simply by using a grout refresh. Grout refresh is a product used to change the color of your existing grout and seal up any joints. It’s readily available at hardware stores and online and comes in multiple colors.


Images from House Homemade
Grout refresh is a good option if your existing tiles are in great condition, but your grout has adopted an unattractive shade.
Option 2: Cover Your Floor in Tile Paint
For a more worn-down surface or for existing tiles that feature a strong pattern you don’t want to accidentally peek through, prepping your floor with tile paint is an easy solution. You can paint the entire surface or save paint by painting only the grout, making sure to also paint the edges of existing tiles. This will make applying your tile stickers more forgiving.

Image Source: @sweet_domicile
You don’t have to use white, though. Feel free to use any color of tile paint to prep your surface—this is a great way to play with the colored grout trend!
Step 2: Apply Quadrostyle Tile Stickers
Next, apply individual Quadrostyle tile stickers, making sure to carefully measure and trim edges when necessary. Then, use a soft cloth to smooth over each sticker to make sure to release any trapped air bubbles.
For a detailed guide to installing Quadrostyle tile stickers, use our Tile Sticker User Guide or watch this helpful video, courtesy of @sweet_domicile!
Step 3: Apply The First Coat of Polyurethane Finish
For sealing in tile stickers, we recommend using Minwax Fast-Drying Polyurethane finish simply because it is easy to find online or in your local hardware store and it gets the job done. Minwax polyurethane finish comes in satin, semi-gloss, and gloss finish, though we recommend using satin for floors. Minwax also has a water-based Polycrilic finish that will work just as well.
*Note: We are in no way affiliated with Minwax, so, in addition to reading this tutorial, it is important that you review and follow the manufacturer’s instructions.
First, start by stirring the polyurethane finish, making sure to eliminate any separation or settling of the product. Do not shake. If you complete this project in one day, you won’t need to re-stir.

Source: Minwax
Next, apply a thin coat of Minwax polyurethane to the floor using a high-quality natural bristle brush, foam roller, or lambswool applicator. Make sure to maintain a wet edge to prevent lap marks.
Ideally, you should wait 3-4 hours before applying a second coat. If you let this layer dry for more than 12 hours, you may need to lightly sand it before applying a second coat.
Step 4: Lightly Sand the Surface & Apply Two or More Coats
As just mentioned, it isn’t necessary to sand your first coat of polyurethane if you apply the second coat after about 3 to 4 hours. However, if you have other tasks to get done and have to wait longer, you should lightly sand the first layer before applying a second. Sanding will eliminate any dust that has settled while drying.
Minwax suggests using a 220 grit sandpaper, grit pad, or screen. Do not use a belt or drum-type sander for sanding between coats.
Use a microfiber cloth to remove any debris left from sanding before applying the next coat. We recommend applying about three coats of polyurethane finish or until you feel confident that the edges of the tile stickers are locked in.
Step 5: Let Dry 24 Hours
Finally, let the polyurethane finish dry for 24 hours before subjecting your floor to light activity. By now, your floors should look smooth and strong, ready to take on years of action!
Have you tried sealing in your tile stickers? We’d love to hear how it turned out! Send us your results for a chance to save 15% on your next Quadrostyle order!
Leave a comment
All comments are moderated before being published.
This site is protected by hCaptcha and the hCaptcha Privacy Policy and Terms of Service apply.