Looking for a simple, cost-effective, and fun craft to kick off the new year? Try wallpapering your furniture!
Aside from creating chic, unique pieces to decorate your home, there are a thousand and one reasons to try this decorating technique. But since we don’t have the time or the word count to wax lyrical about the wonders of wallpapering, we’ve narrowed it down to three.

Source: Etsy – TheResplendentCrow
#1 – It’s sustainable!
If you’re like us, you love tweaking, adding new touches, and transforming your home style, but it’s important to be wary of overconsumption. In these trying times, sustainability is the name of the game, and it’s especially important when it comes to interior decorating.
Using wallpaper to decorate furniture is one way to upcycle old, used pieces into updated, personalized ones. Whether it’s pieces you find at a thrift store or old ones laying around the house, think of them as a blank canvas for you to customize with the wallpaper of your preference.
#2 – Set Yourself Apart
At this point, “fast” furniture has become a fixture in homes all around the world, most notoriously from IKEA, but also from cult-favorite brands like CB2. The upside of stores like these is that they create beautiful, affordable furniture, but the unfortunate downside is that everybody ends up with the same stuff.
Decorating with wallpaper is an easy way to set your furniture apart from the rest. Their often simple designs make for an ideal starting point for achieving the look you want in your home.

Source: Hometalk
#3 – It’s cheap
Giving new life to old furniture prevents wasteful purchasing of potentially expensive new pieces and, unless you intend to buy furniture from a thrift store or from IKEA, it only costs as much as the wallpaper. So, if you’re interested in renovating your home on a budget, wallpapering your furniture is the perfect design project for you.
So, do a quick mental scan and take stock of all the furniture you currently have lying around your house—that Billy Bookcase in the office, the outdated China cabinet your parents gave you, a boring dresser that could use some sprucing up...these are all surfaces just waiting to be trimmed with wallpaper! And what’s more, it’s unbelievable simple.
Just follow these simple steps!
How To Decorate Furniture With Wallpaper
Before you begin wallpapering your furniture, you’ll need a few tools:
- A pencil
- A tool for measuring
- A cutter, razor blade, or scissors
- Wallpaper glue (if not using adhesive wallpaper)
- A wallpaper hanging brush or soft cloth
Step 1: Prep the Surface
When it comes to the kinds of surfaces you can cover with wallpaper, the possibilities are limitless. However, it’s important to note that not all surfaces take to wallpaper the same way. You’ll either want to choose a wallpaper that you know will adhere nicely to the surface or you’ll have to adapt the surface to your wallpaper of choice
If you are using a non-adhesive wallpaper, for example, you will need wallpaper glue, which does not stick to glass. So, if you intend to cover a glass surface, you should use double-sided tape or choose an adhesive wallpaper.
Quadrostyle adhesive wallpaper is ideal for covering wallpaper for several reasons. First, it eliminates the cost of wallpaper glue. Secondly, it naturally sticks to a wide variety of surfaces, including satin-finished drywall, ceramic tile, linoleum, plastic, as well as particleboard or melamine, which is often featured in IKEA furniture.
Our wallpaper does not stick to any porous materials, cracked, or unsealed surfaces, matte-finished drywall, or raw wood. Wooden furniture you wish to cover with wallpaper should be varnished first.
It’s also a good idea to smooth out textured surfaces and thoroughly clean and dry surfaces before applying wallpaper in order to ensure a flawless finished product.
Step 2: Measure and Cut
Save yourself a sticky mess and plenty of time by measuring out the surface area you plan to wallpaper. Keep in mind the way you want your furniture to look when it’s done. Do you want clean lines? Invisible edges?
For example, if you are covering the front of a drawer, measure enough paper to wrap around the edges. Your measurements don’t have to be exact because the edges of the paper won’t be visible. On the other hand, if you are covering an edged surface, such as a panel of a bookshelf, you’ll want to be very precise.
If you’re nervous about cutting the wrong dimensions or cutting crooked lines, it’s better to cut pieces that are too big. You can always trim off the excess later!

Source: A Beautiful Mess
Step 3: Apply and Smooth Out Air Bubbles
Once you’ve cut out your wallpaper pieces, all that’s really left to do is apply your wallpaper!
If using a non-adhesive wallpaper, first apply wallpaper glue directly to the surface or onto the wallpaper, as indicated, then work slowly to apply the wallpaper to your furniture, make sure to avoid air bubbles as much as possible.
If using an adhesive wallpaper, like Quadrostyle wallpaper, simply peel and stick, also taking care to avoid air bubbles.
Once the wallpaper has been applied, use a soft cloth or wallpaper brush to work out any air bubbles until it’s perfectly smooth. Alternatively, you could use a straight edge like a spatula or credit card to push bubbles out.
Step 4: Trim to Perfection
At this point, you may be finished wallpapering your furniture, but if certain edges are hanging off or look uneven, this is a good time to trim off excess with a razor blade or utility blade. Once the edges are looking spick and span, your project is complete!
Feed Your Wallpaper Inspiration
Love the idea of wallpapering your old or drab furniture, but not sure where to try it out? It’s a great technique for decorating the inside or outside of cabinetry, bookshelves, tabletops, and dressers. You can even use it to cover the full surface area of smooth, flat furniture like blocky coffee tables or nightstands. But let’s not ramble on.
Here are some examples of wallpapered furniture to help inspire you!
Give Your Billy Bookcase Some Flare
Adding wallpaper to the back panel of the classic IKEA staple is an easy way to make your Billy stand out. Then, turn this uber-popular build-it-yourself bookshelf into a unique statement piece by finishing it up with a painted trim!

Source: Apartment Therapy
Step in Style
Stepstools deserve love too! If it’s just going to be sitting there in the corner waiting to be used, you might as well make it worth looking at. We recommend using Quadrostyle vinyl wallpaper, which, despite being thin and lightweight, is engineered to be durable, and outlast all the stomping it’s bound to endure.

Source: Coté Maison
Dress Up Your Dresser
One of the most popular IKEA pieces to makeover with wallpaper is the RAST dresser, and it’s easy to see why! Its simple build is a perfect canvas for customizing as seen here, where the frame has been painted black and the drawers covered over with a black and gold wallpaper. But don’t forget the finishing touch—glimmering brass knobs tie it all together!

Source: Home Beautiful
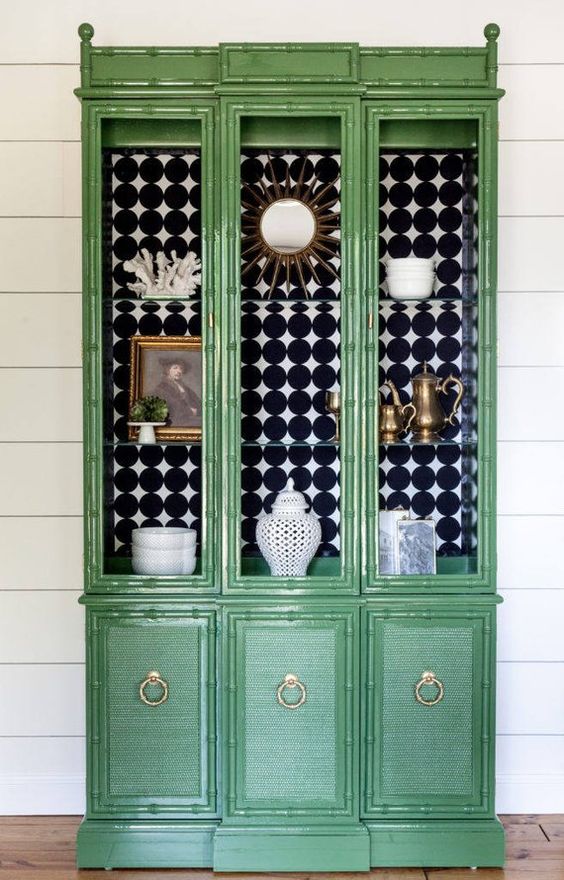
Revive The China Cabinet
Ah, the China cabinet, the piece of furniture that could always use a little dazzling up! Here, the back panel of an oak cabinet has been covered with Quadrostyle Agadir wallpaper, giving it a hint of personality as well as lightening an otherwise heavy installment.

Put Some Flash in Your Formica
Formica chairs like these are a mid-century staple and timeless choice for kitchen dining arrangements. Here, the Formica chair gets extra retro with Quadrostyle Diamond wallpaper in mustard. Perfect for those who aren’t shy about showing off their personality!

Top It Off With Wallpaper
Keep it simple by covering a single surface, such as the top of a table, nightstand, or dresser, such as this one. Quadrostyle Syracuse wallpaper adds a welcome dash of pale pink to an otherwise white-washed room!

Make Your Entertainment Console More Dynamic
When Kelli from @myhouseof8 accidentally ordered the wrong sized Willow in Fonte Grey tile stickers for her bathroom floor, she didn't let her stickers go to waste—she used them to add dimension to her entertainment console! This easy addition keeps it simple and classy.

Before & After

Source: @myhouseof8
Check out Kelli's "Shelf Backsplash" Highlight on Instagram to see how she did it or watch the video here:
Can’t wait to get started on your wallpaper project? Inspire others to follow suit by pinning this article!
Leave a comment
All comments are moderated before being published.
This site is protected by hCaptcha and the hCaptcha Privacy Policy and Terms of Service apply.